Update Sept 10 2019: After some updates to both sides of the code, this now works natively! For details, see the updated blog post here: https://blogs.serioustek.net/post/2019/09/10/duo-mfa-with-netscaler-nfactor-part-2
—–
Duo Security provides a rich identity management and authentication platform and it is commonly used to enable multi-factor authentication in enterprise networks. Duo is very flexible and has examples for integrating with NetScaler here – you will see that there are two different configuration examples: one for using the Duo auth proxy service to do AD authentication as well as additional factors, and a second for using the Duo service to do just MFA.
Both of these configurations work using a ‘Duo authentication proxy’ that gets installed on a local server and communicates with the NetScaler via radius and they work very well for multi factor authentication scenarios. A ‘Duo Prompt’ is presented to the user and they are able to use one of three different factors to validate their login. All secure communication to the Duo service is handled via the auth proxy service rather than the NetScaler.
The Problem
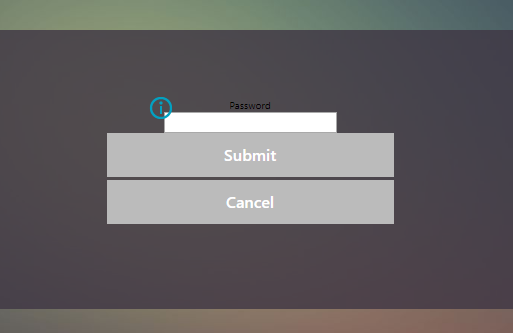
The problem is that the examples linked above will break if you try to use NetScaler AuthV2 aka nFactor (or even the RfWebUI theme which is based on AuthV2). This is due to the fact that the Duo Prompt is delivered from the auth proxy via an iFrame which is not currently compatible with AuthV2 (without some heavy coding). So if you try to configure Duo using the above methods in conjunction with nFactor, you will likely get a page that looks like this:
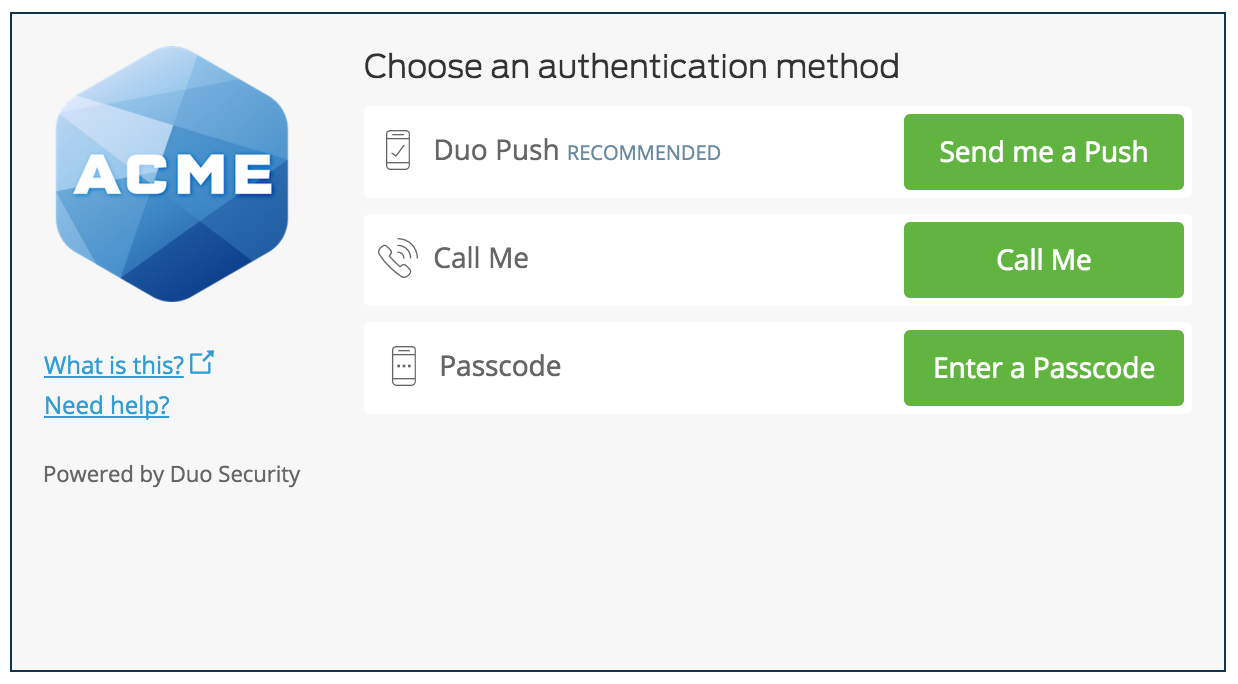
Instead of a nice prompt like this:
The (Sort-of) Workaround
You can configure the Duo auth proxy to perform just like a typical radius server and present users with a ‘passcode’ field in addition to username and password…but what about the push and call me options? We will actually use this workaround to get to the solution, but we are also going to use native nFactor capabilities. The problem is that the iFrame is not supported, and that is what gets presented to users for them to choose the method of verification…but if you look at it (the Duo prompt) it is nothing more than a logo and 3 choices – everything else is still handled by the Duo auth proxy.
When I was looking at this problem, I realized that there are two potential solutions:
- Using some serious code modifications to allow the NetScaler to either properly display the iFrame presented via the auth proxy…or even to completely work without the auth proxy service. I’ll refer to this as the hard way.
- Replace the duo prompt functionality with nFactor capabilities, thus allowing the user to choose the validation method via Duo.
I opted for option number B.
What You Will Need
Some of the prerequisites you will need to get this all working:
- A NetScaler appliance with at least 11.0 (I would suggest 11.1 at a minimum)
- An existing Duo Security account and configuration – Duo is nice enough to allow a free account for testing and demo purposes
- A radius app definition in Duo (see here – we need the integration keys and api host)
- Duo authentication proxy installed and running with a basic configuration (documentation here)
- An authentication vServer, an auth profile if using gateway, and an existing LDAP auth advanced policy definition on the NetScaler
- Working knowledge of nFactor authentication (see this post)
You should already have the auth proxy up and running at this point – it is a simple service and is well documented with good logging capabilities. It should also be noted that we will NOT be using the existing Duo\NetScaler integration documentation – this method is based purely on radius communication and there is no need for the Duo prompt iFrame or for the auth proxy to authenticate the user with AD. The way that this workaround works is to configure multiple radius server listeners on the auth proxy each with a single factor defined. This way, we can use nFactor with multiple radius policies based on which selection is made by the user.
Configure the Auth Proxy
To get started, let’s configure the auth proxy service – here is an example configuration, make necessary changes to accommodate your environment:
[radius_server_auto2]
ikey=YOURIKEYGOESHERE
skey=YourSKeyGoesHere
api_host=your-apihost.duosecurity.com
failmode=safe
radius_ip_1=10.1.1.13
radius_secret_1=radiuspsk123
client=duo_only_client
factors=push
port=18121

[radius_server_auto3]
ikey=YOURIKEYGOESHERE
skey=YourSKeyGoesHere
api_host=your-apihost.duosecurity.com
failmode=safe
radius_ip_1=10.1.1.13
radius_secret_1=radiuspsk123
client=duo_only_client
factors=phone
port=18122

[radius_server_auto4]
ikey=YOURIKEYGOESHERE
skey=YourSKeyGoesHere
api_host=your-apihost.duosecurity.com
failmode=safe
radius_ip_1=10.1.1.13
radius_secret_1=radiuspsk123
client=duo_only_client
factors=passcode
port=18123
Once you have the configuration file updated, you will need to restart the auth proxy service and verify that it stays running, if not, check the log file to determine which line in the configuration contains an error. Also, take note of the different factors and which ports they are listening on as we will need this information to configure the radius server definitions on the NetScaler.
NetScaler RADIUS Configuration
The first thing we will do on the NetScaler is configure the radius server definitions and the advanced auth policy expressions. Under Security > AAA >Policies > Advanced > Actions > RADIUS configure three very similar server definitions, taking note of the secret key and port number of the server as defined above. Also note that you will need a timeout of at least 60 seconds to allow for Duo communication and the user to approve the request etc.
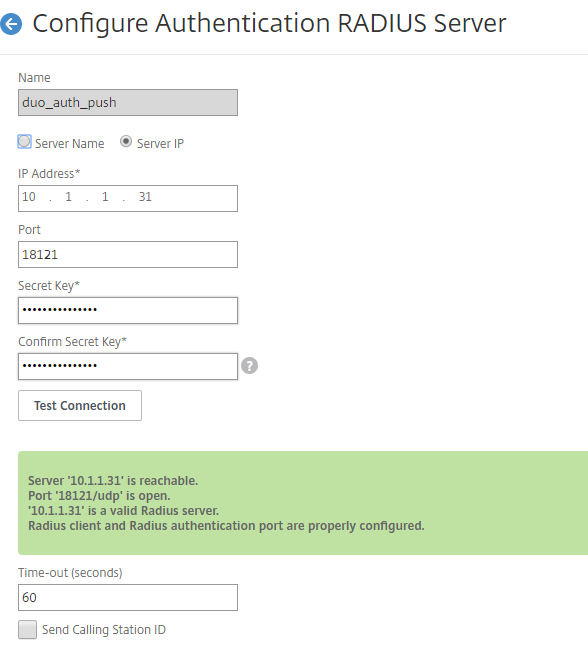
The only other non-default setting used in the server definition is password encoding is set to MSCHAPv2. You should now have 3 radius server actions:
![]()
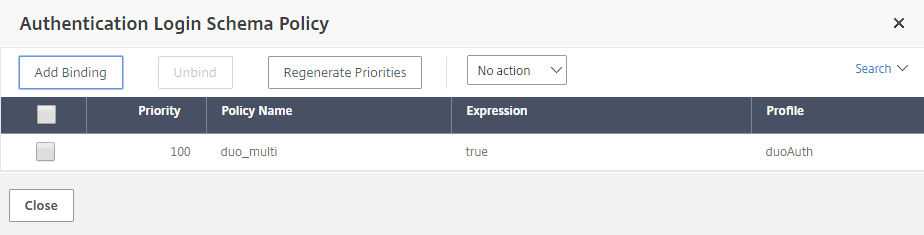
Next, we need to configure the advanced auth policies under Security > AAA >Policies > Advanced > Policy. Again, create 3 very similar policies, taking note of the expression, both the AFTER_STR string and the CONTAINS string as these are used later in the nFactor schema configuration.
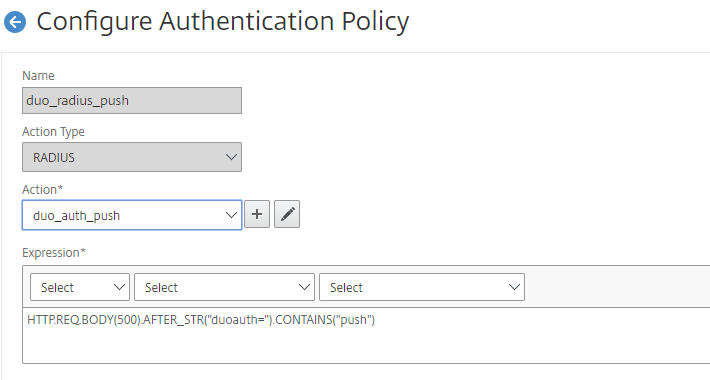
The three expressions are as follows (don’t copy paste):
HTTP.REQ.BODY(500).AFTER_STR(“duoauth=”).CONTAINS(“push”)
HTTP.REQ.BODY(500).AFTER_STR(“duoauth=”).CONTAINS(“call”)
HTTP.REQ.BODY(500).AFTER_STR(“duoauth=”).CONTAINS(“pass”)
Match the CONTAINS string to the pre-created radius server actions. You should now have 3 additional advanced auth policies:
![]()
NetScaler Login Schemas
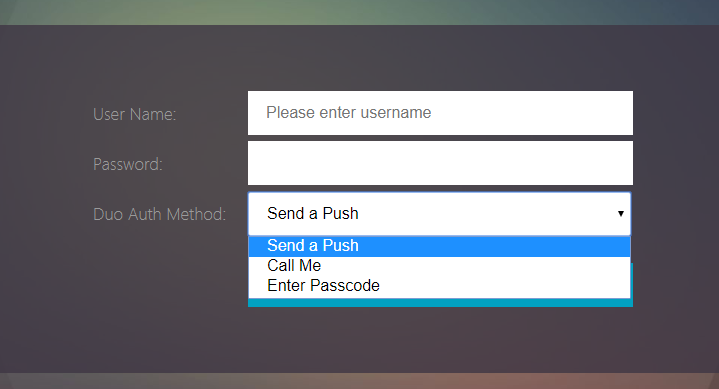
Now we need to configure the login schemas for this workflow – there are a few options, this post will contain two of those options, but it should be more than enough to work into nearly any configuration. The first workflow is to have the username field, password fields, and Duo auth selection all in a single factor. The first schema below will generate a UI that looks like this:

Login schema XML:
<?xml version="1.0" encoding="UTF-8"?>
<AuthenticateResponse xmlns="http://citrix.com/authentication/response/1" >
<Status >success </Status>
<Result >more-info</Result>
<StateContext />
<AuthenticationRequirements>
<PostBack> /nf/auth/doAuthentication.do</PostBack>
<CancelPostBack>/nf/auth/doLogoff.do</CancelPostBack>
<CancelButtonText>Cancel</CancelButtonText>
<Requirements>
<Requirement><Credential><ID>login</ID><SaveID>ExplicitForms-Username</SaveID><Type>username</Type></Credential><Label><Text>User Name:</Text><Type>plain</Type></Label><Input><AssistiveText>Please enter username</AssistiveText><Text><Secret>false</Secret><ReadOnly>false</ReadOnly><InitialValue></InitialValue><Constraint>.+</Constraint></Text></Input></Requirement>
<Requirement><Credential><ID>passwd</ID><SaveID>ExplicitForms-Password</SaveID><Type>password</Type></Credential><Label><Text>Password:</Text><Type>plain</Type></Label><Input><Text><Secret>true</Secret><ReadOnly>false</ReadOnly><InitialValue></InitialValue><Constraint>.+</Constraint></Text></Input></Requirement>
<Requirement><Credential><ID>duoauth</ID><Type>none</Type></Credential><Label><Text>Duo Auth Method:</Text><Type>plain</Type></Label><Input><ComboBox><InitialSelection>push</InitialSelection><DisplayValues><DisplayValue><Display>Send a Push</Display><Value>push</Value></DisplayValue><DisplayValue><Display>Call Me</Display><Value>call</Value></DisplayValue><DisplayValue><Display>Enter Passcode</Display><Value>pass</Value></DisplayValue></DisplayValues></ComboBox></Input></Requirement>
<Requirement><Credential><ID>loginBtn</ID><Type>none</Type></Credential><Label><Type>none</Type></Label><Input><Button>Log On</Button></Input></Requirement>
</Requirements>
</AuthenticationRequirements>
</AuthenticateResponse>
The next workflow simply creates a ‘Duo auth factor’ that is displayed once the user has been authenticated, including the already entered username. The UI for this specific factor will display this:
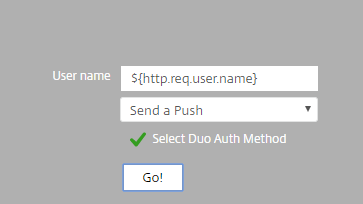
Login schema XML (PreFillUserDuo):
<?xml version="1.0" encoding="UTF-8"?>
<AuthenticateResponse xmlns="http://citrix.com/authentication/response/1">
<Status>success</Status>
<Result>more-info</Result>
<StateContext></StateContext>
<AuthenticationRequirements>
<PostBack>/nf/auth/doAuthentication.do</PostBack>
<CancelPostBack>/nf/auth/doLogoff.do</CancelPostBack>
<CancelButtonText>Cancel</CancelButtonText>
<Requirements>
<Requirement><Credential><ID>login</ID><SaveID>ExplicitForms-Username</SaveID><Type>username</Type></Credential><Label><Text>User name</Text><Type>plain</Type></Label><Input><AssistiveText>Please supply either domain\username or [email protected]</AssistiveText><Text><Secret>false</Secret><ReadOnly>true</ReadOnly><InitialValue>${http.req.user.name}</InitialValue><Constraint>.+</Constraint></Text></Input></Requirement>
<Requirement><Credential><ID>duoauth</ID><Type>none</Type></Credential><Label><Type>none</Type></Label><Input><ComboBox><InitialSelection>push</InitialSelection><DisplayValues><DisplayValue><Display>Send a Push</Display><Value>push</Value></DisplayValue><DisplayValue><Display>Call Me</Display><Value>call</Value></DisplayValue><DisplayValue><Display>Enter Passcode</Display><Value>pass</Value></DisplayValue></DisplayValues></ComboBox></Input></Requirement>
<Requirement><Credential><Type>none</Type></Credential><Label><Text>Select Duo Auth Method</Text><Type>confirmation</Type></Label><Input /></Requirement>
<Requirement><Credential><ID>loginBtn</ID><Type>none</Type></Credential><Label><Type>none</Type></Label><Input><Button>Go!</Button></Input></Requirement>
</Requirements>
</AuthenticationRequirements>
</AuthenticateResponse>
Feel free to modify the schema to customize any strings, etc. However, do NOT modify the credential ID of duoauth or the ComboBox display values as these are referenced in the radius action expressions.
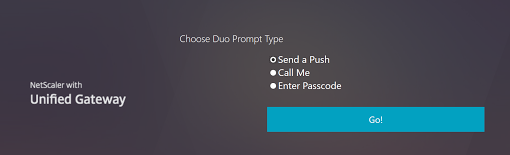
Edit 5/1/2018: See below for the Login Schema XML for a radio button factor
<?xml version="1.0" encoding="UTF-8"?>
<AuthenticateResponse xmlns="<a class="Xx" dir="ltr" tabindex="-1" href="https://www.google.com/url?q=http://citrix.com/authentication/response/1&sa=D&source=hangouts&ust=1525266050625000&usg=AFQjCNFB3vuWEvs_qSXTna9usXVEOkUWsQ" target="_blank" rel="nofollow noreferrer noopener" data-display="http://citrix.com/authentication/response/1" data-sanitized="https://www.google.com/url?q=http://citrix.com/authentication/response/1&sa=D&source=hangouts&ust=1525266050625000&usg=AFQjCNFB3vuWEvs_qSXTna9usXVEOkUWsQ">http://citrix.com/authentication/response/1</a>">
<Status>success</Status>
<Result>more-info</Result>
<StateContext></StateContext>
<AuthenticationRequirements>
<PostBack>/nf/auth/doAuthentication.do</PostBack>
<CancelPostBack>/nf/auth/doLogoff.do</CancelPostBack>
<CancelButtonText>Cancel</CancelButtonText>
<Requirements>
<Requirement><Credential><ID>title</ID><Type>none</Type></Credential><Label><Text>Choose Duo Prompt Type</Text><Type>plain</Type></Label></Requirement>
<Requirement><Credential><ID>duoauth</ID><Type>none</Type></Credential><Label><Type>none</Type></Label><Input><RadioButton><InitialSelection>push</InitialSelection><DisplayValues><DisplayValue><Display>Send a Push</Display><Value>push</Value></DisplayValue><DisplayValue><Display>Call Me</Display><Value>call</Value></DisplayValue><DisplayValue><Display>Enter Passcode</Display><Value>pass</Value></DisplayValue></DisplayValues></RadioButton></Input></Requirement>
<Requirement><Credential><ID>loginBtn</ID><Type>none</Type></Credential><Label><Type>none</Type></Label><Input><Button>Go!</Button></Input></Requirement>
</Requirements>
</AuthenticationRequirements>
</AuthenticateResponse>
NetScaler nFactor Configuration
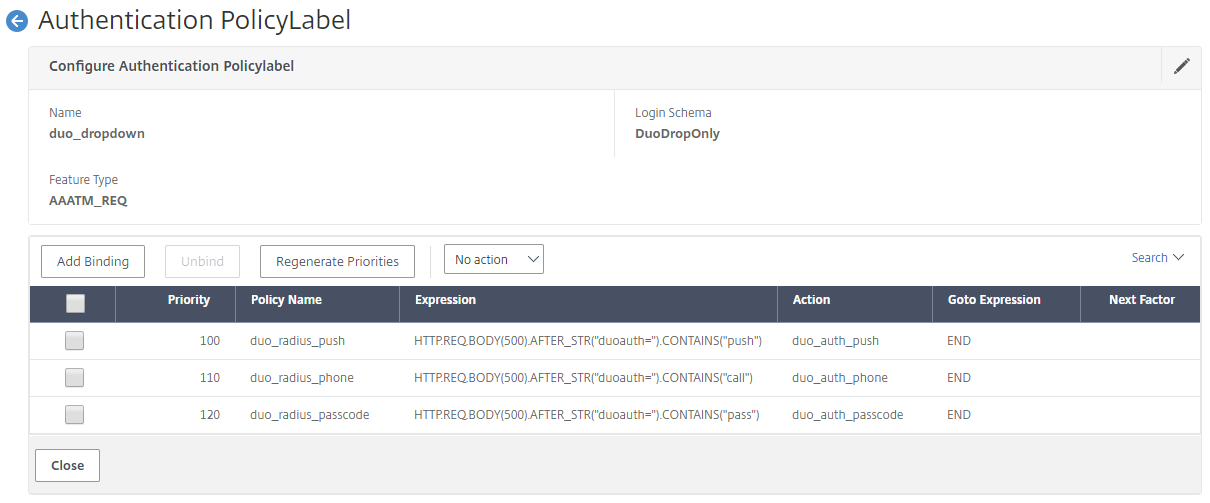
First, we need to create some authentication policy labels (Security > AAA > Policies > Auth > Advanced > PolicyLabel).
We will create a PL (duo_dropdown) that will be used by either of the workflows defined above – it will contain the 3 radius policies created earlier, bound with a GoTo Expression of END. This PL will have a noSchema (DuoDropOnly) schema bound as well.
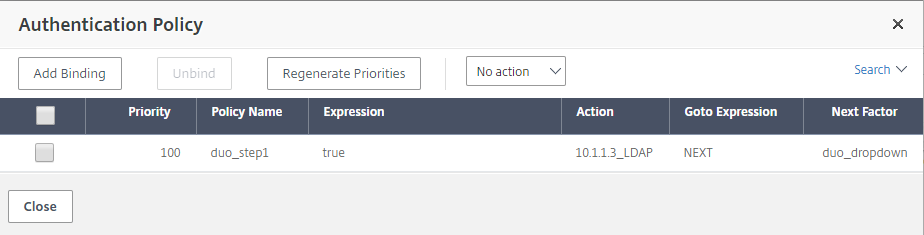
For Username\Password\Duo combined in a single factor: You should already have an authentication vServer configured with an LDAP policy. To convert this to use Duo, you need to set the Next Factor of the LDAP advanced policy to be the PL created earlier (duo_dropdown) as well as to bind the Login Schema using the 1st XML above – remember, for the AAA vServer, you need to create a login schema policy – in this example, the expression is simply ‘true’.
The end result:
For Duo as separate factor: create a PL (duo_user_dropdown) that will display the pre-filled user field and Duo auth dropdown. Bind the 2nd login schema defined above (PreFillUserDuo) and bind a NoAuth policy. The next factor will be the PL created above (duo_dropdown).

We will again use the existing authentication vServer configured with an LDAP policy. The login schema can stay the same, only the Next Factor for the ldap policy needs to change to point to the PL created above (duo_user_dropdown)
The end result:

Notes
- Feel free to change the assistive text strings to match your deployment needs
- You can also modify the radius server policy expression to include group membership
- It is also possible to use radio buttons in the login schema to achieve the same functionality as the drop down
- Read up on the SDK for more details on what you can do in the Login Schema
Thanks to JasonM for insisting that this had to be possible and helping me to get it working – his post on this is available here.
Hi, I am trying to implement the same with Duo. Below is my flow:
1. LDAP
2. Group check
3. Duo Radio button for MFA user group
When MFA user is redirected to radio button login schema, he gets “Try again or contact helpdesk”. aaad.debug shows – Received RAD_ACCESS_REJECT and Authentication failed for user from server X.X.X.X – Invalid Credentials
I tested individual Radius policies by binding them as basic policy to Gateway and it works. Issue is when I call them using nFactor through Radio button login schema.
Am I missing something?
Hi Srini,
It sounds like you may need a no_authn somewhere as remember, the duo schema is not doing any authentication, just displaying the page.
Hi Jacob,
I’m curious, knowing that DUO doesn’t support RFWEB UI for the inline display of DUO, and in your post you are using X1 on AAA, could you then use the RFWEBUI on the Gateway?
I mean, since the gateway is offloading the auth to AAA, and AAA is using a DUO supported theme, why couldn’t we use RFWEBUI on the gateway to give the users what some would call a better display.
Thanks
Kara
Hi Kara,
The issue is with nFactor\RfWebUI…while yes, the AAA vServer is “offloading” authentication, the gateway vServer is what is actually rendering the page – you can change the theme of the AAA vServer that is referenced in the authenticationProfile, but it will never change what is rendered when you login to the gateway vServer. More specifically, the issue lies with the way the Duo Prompt is rendered with jQuery…hopefully, this will be addressed soon.
I used a variation on this setup to just have the 2nd always be a duo push for our users.
it doesn’t provide any feedback for the users that the duo push is happening though.
any thoughts on how to provide a notification (eula type page) that will automatically trigger the duo push and then proceed without a clicking a button on that factor? i tried a login schema with no button and removed all the requirements besides text field and no luck. it seems like the bound policies dont get triggered till the form is submit and it can’t be done automatically. (maybe with some javascript but not native netscaler nfactor)
Hi Jake, Thanks for the write up! I’m wondering if you ever had to setup another radius 2fa solution that only has one service port? Duo has 3 as well the webgui support but what about other solutions that only has actionable port.
I’m working with Oneidentity Starling 2FA radius connector and am having trouble setting up respond buttons during the OTP challenge page to let the Starling 2fa know to either send the user sms, text or via an app push. Currently the work around is users having to actually type “sms” or “call” each time.
https://discussions.citrix.com/topic/407445-nfactor-dualauth-logon-schema-and-radius-otp-challenge-buttons/
Hi Danny,
I’ve not use OneIdentity before so I’m not familiar with it. That said, if users can enter text, then it should be possible for nfactor to do the same thing. Let me see about getting some licenses and setting it up in the lab.
That would be so awesome, I just hope it doesn’t require custom handlers haha. One identity Starling offers a free trial. https://www-test.cloud.oneidentity.com/ The radius connector download link is https://support.oneidentity.com/download-install-detail/6103336
Question: during an OTP challenge page, how would we go about adding a string response back to the radius server? Ideally, some buttons that tells a 2FA radius server sms, phone, or push.