Customize NetScaler 10
I have been meaning to create this post for some time – when NetScaler 10.1 was released, there was some confusion around the best method to customize the interface. The previous method involved using scripts to copy the customized files at boot time – see http://support.citrix.com/article/CTX122271 for details. I know many people are already on NetScaler 11, but for those that have not yet upgraded and are still on 10.5 this should be useful.
The new method using the CustomTheme file is significantly simpler but there are a few caveats that you need to be aware of.
How it Works
The new customization method works using zipped theme files that are extracted at boot time – this resolves the old ‘how to persist NetScaler customizations after reboot’ problem. Special care must be taken to ensure two things:
- Copy the zipped theme file to the secondary node in an HA pair (or cluster)
- Use the firmware update method noted below when upgrading the NetScalers with a custom theme deployed
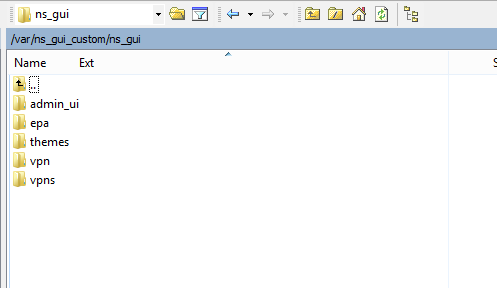
When using a standard theme, there is a symlink that defines the UI:
/netscaler/ns_gui -> /var/netscaler/gui
However, once you choose the custom theme, this changes:
/netscaler/ns_gui -> /var/ns_gui_custom/ns_gui
Getting Started
To set up the custom theme, you will need to start with one of the in-box themes. Set this using Access Gateway global settings > User Experience > UI Theme – to start with, use either the default (black chrome) or Green Bubble to build your custom theme; use the guides below to customize.
Now we need to setup the custom theme zip
- Once you have made all customizations required to the inbox theme /netscaler/ns_gui/ (/var/netscaler/gui) we need to zip them up
- If you have not already, create this directory: /var/ns_gui_custom – from an SSH command line:
- shell
- mkdir /var/ns_gui_custom
- Staying in ‘shell’ mode in SSH, navigate to the /netscaler directory:
- cd /netscaler
- Create the file containing the customized theme you just created (note the wildcard at the end):
- tar -cvzf /var/ns_gui_custom/customtheme.tar.gz ns_gui/*
- Use SCP (or another tool) to copy the customthem.tar.gz file to the secondary NetScaler
Upgrading the NetScaler Firmware with a Custom Theme
Special care must be taken when upgrading the NetScaler firmware – inside of the customtheme.tar.gz is the ‘admin_ui’ directory which creates all of the web admin UI pages. When a NetScaler is upgraded, these pages change, but when the custom theme is extracted at boot time, the zip file will contain the admin_ui files and cause errors on the web UI. To properly upgrade a NetScaler with a custom theme deployed, do the following:
- Prior to upgrading, copy off any directories with customization – it should likely only be the /vpn directory
- Set the global UI Theme to either default or green bubbles
- Perform the upgrade
- Re-apply the customizations to the standard theme (/netscaler/ns_gui)
- Re-build the customtheme.tar.gz file
- Copy the new file to the secondary NetScaler
- Re-set the global UI Theme to Custom
If you do not follow this procedure and break the web UI, it’s not that big of a deal, simply run the following command to reset the global UI back to default:
set vpn parameter -UITHEME Default
Then rebuild the customtheme.tar.gz as noted above and set the global UI back to custom.
Customizing the Green Bubble Theme
Use the following image as reference:
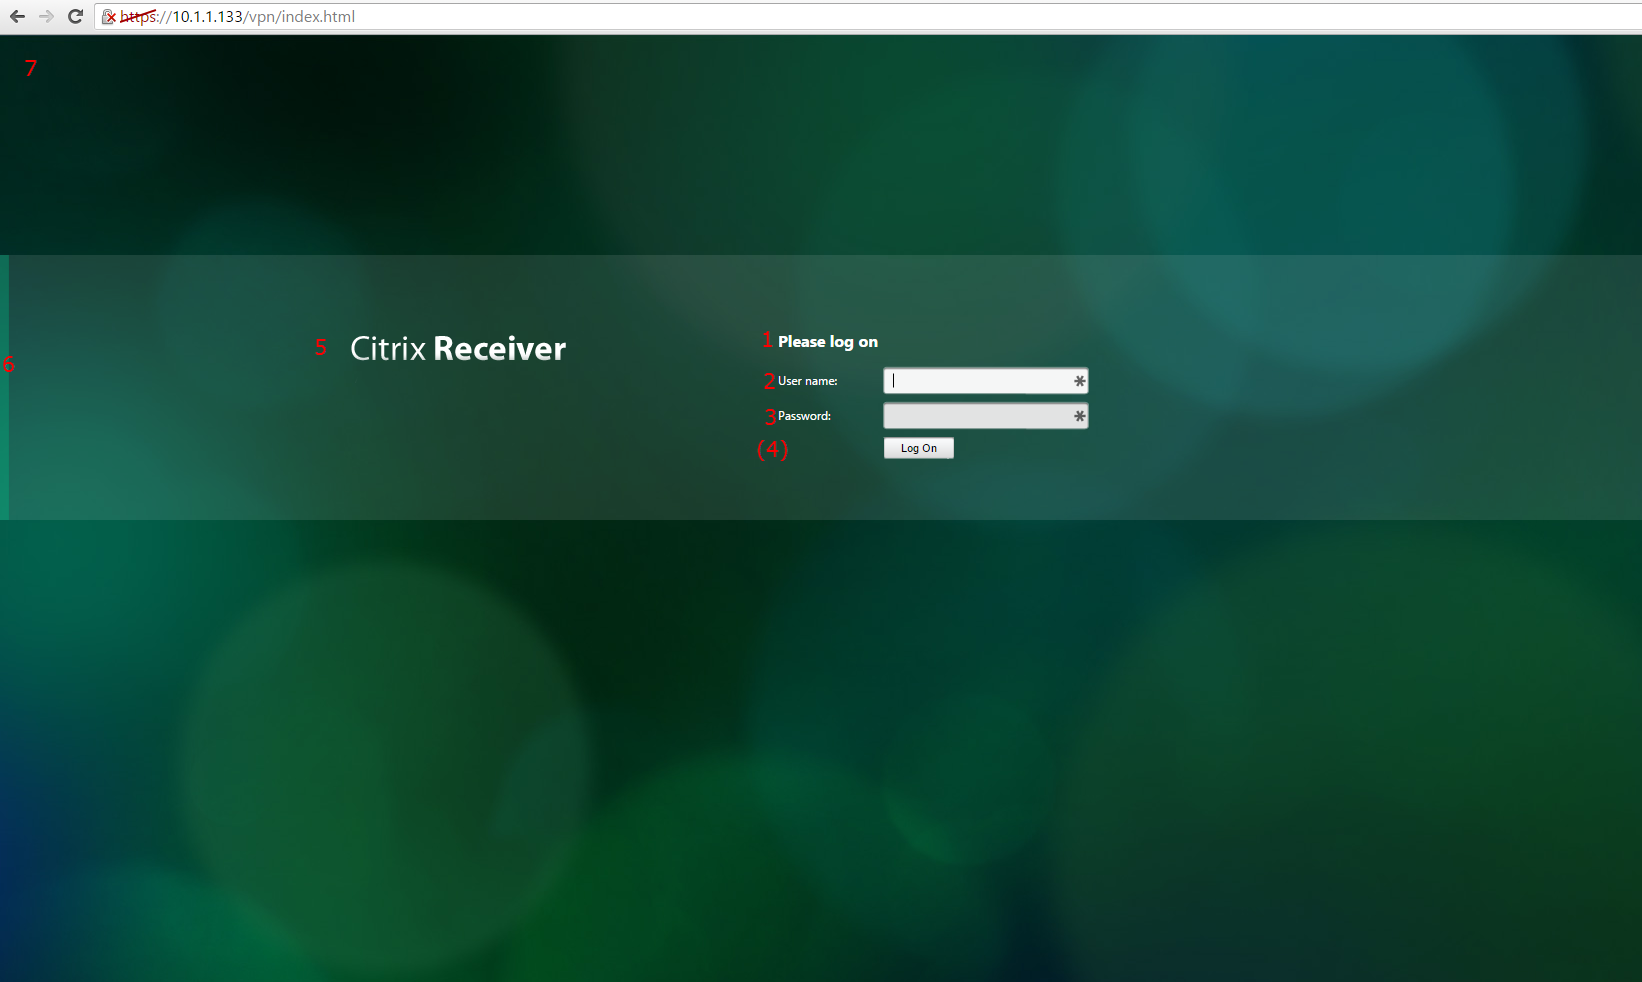
*Note: any reference to the en.xml strings file is for English – there are other language files available.
- Please Log on
- String in /resources/en.xml
- <String id=”ctl08_loginAgentCdaHeaderText2″>Please log on</String>
- User name:
- String in /resources/en.xml
- <String id=”User_name”>User&nbsp;name:</String>
- Password:
- String in /resources/en.xml
- <String id=”Password”>Password</String>
- Password 2:
- String in /resources/en.xml
- <String id=”Password2″>Password 2:</String>
- Citrix Receiver logo
- Defined in /css/ctxs.authentication.css – #logonbox-logoimage
- The default image is /media/logo_notagline.png
- Vertical bar
- Defined in /css/ctxs.authentication.css #logonbox-container
- The default image is /media/VerticalGreenBarOnly.png
- Background
- Defined in /css/ctxsmainstyle.css body{background-image: url(…
- The default image is /media/bg_bubbles.jpg
Customizing the Default Theme
Use the following image as reference:

*Note: any reference to the en.xml strings file is for English – there are other language files available.
- Header logo image
- This is defined in /images/caxtonstyle.css in the ‘.header_left’ section. To remove it, add ‘display: none;’ as follows:
.header_left
{
width: 265px;
height: 62px;
background-image: url(/vpn/images/ctxHeader01.gif);
background-repeat: no-repeat;
display: none;
}
To change the logo to a custom logo, modify the following file – note that the image should have a transparent background and be visible against a black background.
/images/ctxHeader01.gif
- Header banner image
- This is defined in /images/caxtonstyle.css in the ‘.header_middle’ section. To remove it, add ‘display:none;’ as follows:
.header_middle
{
width: 265px;
height: 62px;
background-image: url(/vpn/images/ctxHeader01.gif);
background-repeat: no-repeat;
display: none;
}
To change the logo to a custom logo, modify the following file: /images/ctxHeader02.gif. Also note that you will need to modify the .header_middle style definition to accommodate the dimensions of the new image.
- Glow box top edge
- This is created by the following images:
- /images/LoginPaneTopMidBorderGlow.png
- /images/LoginPaneTopMidBorderGlow.gif
- These can be made custom if the dimensions of the new image remain the same.
- See #7 below – these should keep the same dimensions
- The box is created using the /vpn/nsshare.js file – the width can be customized in the ‘documentWriteGlowBoxUpper()’ function – an example setting the width to 700 pixels:
- This is created by the following images:
function documentWriteGlowBoxUpper()
{
if (suitable_browser_to_use_png == true)
{
document.write(‘<table class=”CTXMSAM_LogonFont” cellpadding=”0″ cellspacing=”0″ align=”center” border=”0″>\r\n’);
document.write(‘<tr>\r\n’);
document.write(‘<td class=”glowBoxTop glowBoxLeft glowBoxTopLeftPng”></td>\r\n’);
document.write(‘<td class=”glowBoxTop glowBoxTopMidPng” width=”700″></td>\r\n’);
document.write(‘<td class=”glowBoxTop glowBoxRight glowBoxTopRightPng”></td>\r\n’);
document.write(‘</tr>\r\n’);
document.write(‘<tr>\r\n’);
document.write(‘<td class=”glowBoxLeft glowBoxMidLeftPng”></td>\r\n’);
document.write(‘<td class=”glowBoxMidPng loginTableMidWidth”>\r\n’);
}
else
{
document.write(‘<table class=”CTXMSAM_LogonFont” cellpadding=”0″ cellspacing=”0″ align=”center” border=”0″>\r\n’);
document.write(‘<tr>\r\n’);
document.write(‘<td class=”glowBoxTop glowBoxLeft glowBoxTopLeft”></td>\r\n’);
document.write(‘<td class=”glowBoxTop glowBoxTopMid” width=”700″></td>\r\n’);
document.write(‘<td class=”glowBoxTop glowBoxRight glowBoxTopRight”></td>\r\n’);
document.write(‘</tr>\r\n’);
document.write(‘<tr>\r\n’);
document.write(‘<td class=”glowBoxLeft glowBoxMidLeft”></td>\r\n’);
document.write(‘<td class=”glowBoxMid loginTableMidWidth”>\r\n’);
}
}
- Welcome text
- The text is defined by a DIV element in index.html. It can be removed by commenting out the line as follows:
<!– <div id=”ctl08_loginAgentCdaHeaderText” style=”padding-left:15px”><span id=”Welcome”></span></div> –>
- The style is defined by .CTX_ContentTitleHeader in /images/caxtonstyle.css
- The text itself is defined by the ‘Welcome’ string id in /resources/en.xml
- Please logon text
- The text is defined by a DIV element in index.html. It can be removed by commenting out the line as follows:
<div id=”ctl08_loginAgentCdaHeaderText2″ style=”padding-left:15px”></div>
- The style is defined by .CTXMSAM_LogonFont in /images/caxtonstyle.css
- The text itself is defined by the ‘ct108_loginAgentCdaHeaderText2’ string id in /resources/en.xml
- Login padlock image
- The images in use are:
- /images/LoginIcon.png
- /images/LoginIcon.gif
- These images can be modified if the dimensions are maintained
- The images are called by ‘function documentWriteActionPane()’ in nsshare.js which references .actionPane and .actionPanePng elements in /images/caxtonstyle.css
- The images in use are:
- Glow box bottom edge
- This is created by the following images:
- /images/LoginPaneFooterMidBorderGlow.png
- /images/LoginPaneFooterMidBorderGlow.gif
- These can be made custom if the dimensions of the new image remain the same.
- See #3 above for further customization – these two should have the same demensions.
- This is created by the following images:
- Citrix Footer Logo
- This is built by function TransferBodyII() in nsshare.js
- The image is defined in the .watermark element in /images/caxtonstyle.css
- The image is /images/CitrixWatermark.gif
- Glow box left side
- This is created by the following images:
- /images/LoginPaneCenterLeftBorderGlow.png
- /images/LoginPaneCenterLeftBorderGlow.gif
- This is created by the following images:
- Glow box right side
- This is created by the following images:
- /images/LoginPaneCenterRightBorderGlow.png
- /images/LoginPaneCenterRightBorderGlow.gif
- This is created by the following images:
- Logon button
- This is defined by .CTX_CaxtonButton in /images/caxtonstyle.css
- The text of the button is defined by the string id of ‘Log_on’ in /resources/en.xml