Ever wish that you could just block all network traffic from known bad IP addresses? When you start to think about the logistics of this, it would be nice if you didn’t have to manage it either. If you have NetScaler Platinum, you’ve got both of your wishes – and as an added bonus, it’s free!
That’s right, if you have a NetScaler Platinum appliance and you are running build 11.0 or later, you have an IP reputation subscription at no additional cost. And you don’t have to manage the database, or honeypots, or anything associated with it – all of that is done by the provider: Webroot Brightcloud. Getting it setup on the NetScaler is easy, too.
Getting Started
First, the requirements:
- A NetScaler appliance with a Platinum license
- The NetScaler needs to be running 11.0 or later code
- Either direct or proxied web access to: api.bcss.brightcloud.com over port 443
- DNS must be configured and able to resolve the above FQDN
- *Note: each node in an HA pair or cluster will download the IP Reputation database from the above FQDN, not via HA communication
Once the above is met, you can begin the configuration.
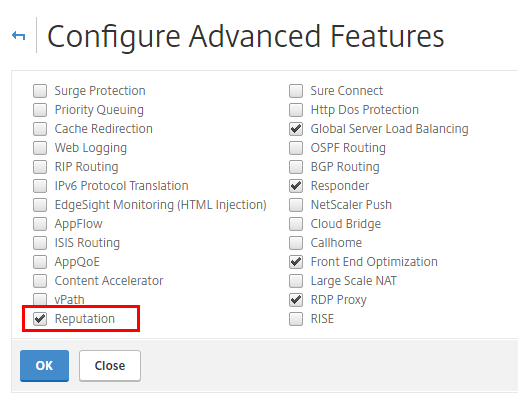
- Enable Reputation
GUI: System > Settings > Configure Advanced Features
CLI:
enable feature [ rep | reputation ]
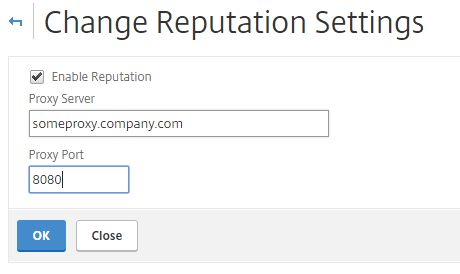
2. (optional) Configure proxy settings if needed – *Note: the Proxy Server can be an IP address or FQDN
GUI: Security > Reputation > Change Reputation Settings
CLI:
set reputation settings -proxyServer <proxy server ip> -proxyPort <proxy server port>
3. Create and bind policies (see below)
Managing IP Repuatation Policies
IP Reputation (IPRep) can be configured using NetScaler default PI expressions in policies bound to supported modules – for example, Application Firewall, Rewrite and Responder. The expressions that can be used are as follows:
- CLIENT.IP.SRC.IPREP_IS_MALICIOUS – this will evaluate to TRUE if the client is included in the malicious IP database
- CLIENT.IP.SRC.IPREP_THREAT_CATEGORY(Category) – this will evaluate to TRUE if the client IP is found in the malicious IP database and is in the specified threat category
The available threat categories are:
- SPAM_SOURCES
- WINDOWS_EXPLOITS
- WEB_ATTACKS
- BOTNETS
- SCANNERS
- DOS
- REPUTATION
- PHISHING
- PROXY
- NETWORK
- CLOUD_PROVIDERS
- MOBILE_THREATS
Policy Examples
This command will create an AppFirewall policy that identifies a malicious IP address and blocks the request
add appfw policy ipr-pol1 CLIENT.IP.SRC.IPREP_IS_MALICIOUS APPFW_BLOCK
This example creates a policy that uses reputation to check the client IP address in a specific header (X-Forwarded-For) and resets the connection if a match is triggered
add appfw policy ipr-pol2 "HTTP.REQ.HEADER(\"X-Forwarded-For\").TYPECAST_IP_ADDRESS_AT.IPREP_IS_MALICIOUS" APPFW_RESET
Note that the above policy examples both use the Application Firewall feature of the NetScaler – if you are unfamiliar with the configuration of AppFW, a basic guide is available here.
Notes and Troubleshooting
If you need to manually whitelist an IP address, this can be done by binding the IPs to a Data Set (AppExpert > Data Sets) then binding to the IPRep policy; further examples are listed in the edocs page listed below.
- The IP Reputation database is is fully downloaded initially when the feature is enabled; after that, a delta is downloaded every 5 minutes
- The database iprep.db is located in the /var/nslog/iprep directory – it is not deleted even if the feature is disabled
- The IPRep data is shared across admin partitions configured on an appliance
Additional information can be found here: https://docs.citrix.com/en-us/netscaler/11/security/reputation/ip-reputation.html
Troubleshooting:
- Logs are located here: /var/log/iprep.log
- Watch for the following messages:
- ns iprep: Not able to connect/resolve WebRoot – this indicates that the appliance may not have internet access or have DNS configured
- ns iprep_curl_download:88 curl_easy_perform failed. Error code: 5 Err msg: couldn’t resolve proxy name – this indicates that the proxy configuration for IPRep may be incorrect
- The IPRep feature takes approximately 5 minutes to begin functioning after initially enabling the feature


2 thoughts on “Getting Started with NetScaler IP Reputation”