These days, SAML authentication is mainstream and web services are expected to support it in some fashion or another; the SAML 2.0 standard is over 10 years old at this point! One of the key areas of focus for NetScaler is Authentication and Authorization and as such you would expect full support of SAML – and you’d be right. But if you’ve never worked with the SAML protocol, it can seem very daunting at first!
The basic idea behind why you need or want SAML is that you want to have some other ‘party’ be authoritative for authentication – other than what 99.99% of enterprises use for authentication, you know…Microsoft Active Directory. The problem with AD is that it only understands username\password and certificate based authentication – if you try to talk federation, it just won’t work natively.
There are three basic concepts with SAML: the Service Provider (SP), Identity Provider (IdP), and the Assertion. The SP provides something that the user needs – an application or service for example. The IdP is the thing that authenticates, or validates the identity of the user. The assertion is a means of communication between the two – SAML is based on XML, so the assertion is mostly human readable. In it’s current build, the NetScaler supports acting as an IdP, an SP, or even both.
NetScaler and SAML
The NetScaler has supported SAML as a Service Provider since the 10.1 build, but there are a ton of different features and functionality that you need to be aware of. If you are looking to do a SAML project with NetScaler, I would recommend at least NetScaler 11.0 build 64.34 to get the most supported features.
| NetScaler as Service Provider | NetScaler as Identity Provider | |
| NetScaler 10.1 | •Signing & Digest: SHA1 only
•Single attribute only •Signature enforcement •POST binding only •NO: Encryption, single logout, AuthnContext, Holder of Key, Certificate Thumbprint |
NOT SUPPORTED |
| NetScaler 10.5 | •REDIRECT binding | •POST binding only |
| NetScaler 11.0 | •Attribute Names up to 127 bytes
•Timed Assertion Validity \ Clock skew •Added ARTIFACT Binding |
•Client Certificate Logon
•SAML Session Cookies •HTTP 401 Authentication •Multiple Attribute Configuration •Redirect binding added •Timed Assertion Validity \ Clock skew •Pre-configured Trusted SP |
| NetScaler 11.1 | •FIPS offload support with signing support now available using SAML bindings: REDIRECT & POST
•FIPS – Only SHA1 supported |
•SAML IdP Complete message signing
•RSA 1.5 encryption support •FIPS offload support with signing support now available using SAML bindings: REDIRECT & POST •FIPS – Only SHA1 supported |
Why Okta?
Because they give stuff away for free!!! If you have never worked with SAML before, if you’re trying to brush up on your SAML skills, or just want a publicly available SAML provider for your lab or testing, go check out Okta Developer – it’s completely free, and gives you everything you need to test, troubleshoot, and understand the SAML protocol. You get a dedicated SP or IdP with a public URL, 3 application definitions, and 100 users – FREE! Plus, you can integrate your Active Directory as well.

A Few Notes
There is a LOT to understand about SAML, which I’m not going to cover in this post, instead, I’ll point you to this post here. But there are a few things you need to be aware of:
- Configuring SAML is not very difficult – essentially, you are configuring two services to talk to each other, and the configuration must be identical on both sides
- Some providers have different names for the same things, so be careful
- The most common binding methods HTTP REDIRECT and HTTP POST do not require a direct connection between the IdP and SP – the assertion is carried by the user client, most commonly a web browser
- SAML relies on timestamps, just like Kerberos does, so NTP must be healthy on your NetScaler (and across your entire network)
- SAML supports both signing of the assertion to prevent tampering as well as encrypting the assertion with a certificate
- The SAML endpoint on the NetScaler is always: https://gateway.fqdn.com/cgi/samlauth
- I recommend configuring the IdP first – there are several things you will need for the SP that are only available after you configure the IdP
- IdP initiated flow
- User logs on to identity provider and is presented with a list of applications; once an application is selected, the assertion is sent to the client then passed to the SP configured for that application
- Users will see the IdP application list
- SP initiated flow
- User opens URL to SP, but is redirected to IdP for authentication; once successfully authenticated, the assertion is passed back to the client then sent to the SP
- Users will see the SP application list
Single Sign-On Considerations
Single Sign-On is great for users because it allows them to only have to remember one set of credentials and enter those credentials one time. The problem with SSO is that it is becoming more complex – especially when you start using different authentication protocols and have on-premesis resources mixed in with cloud\SaaS applications. But don’t give up hope! Just understand what you can do with what you have.
When we are talking about SAML, it is important to understand that the password is NEVER sent in the assertion. This is a problem because it limits what we can do with SSO – and this is not a NetScaler limitation, but a limit of authentication in general. When we have a users password, we can do all sorts of authentication: Forms, HTTP Basic, NTLM, Kerberos – note that’s Kerberos Impersonation – aka: “easy Kerberos”.
If I’m using SAML and I don’t have the users password, the only options for single sign-on are: SAML or Kerberos Constrained Delegation (KCD). If KCD or SAML to the backend is not an option, you can use step-up authentication to gather the users password, but this will obviously be another prompt for password, so it’s not optimal.
Configuration Example
Here are the screenshots of a basic configuration example – this is for the NetScaler as SP and Okta as IdP, using an SP-initiated flow (remember, configure the IdP first) – first, create a basic SAML application in Okta.

Then configure the ‘Advanced Settings’:
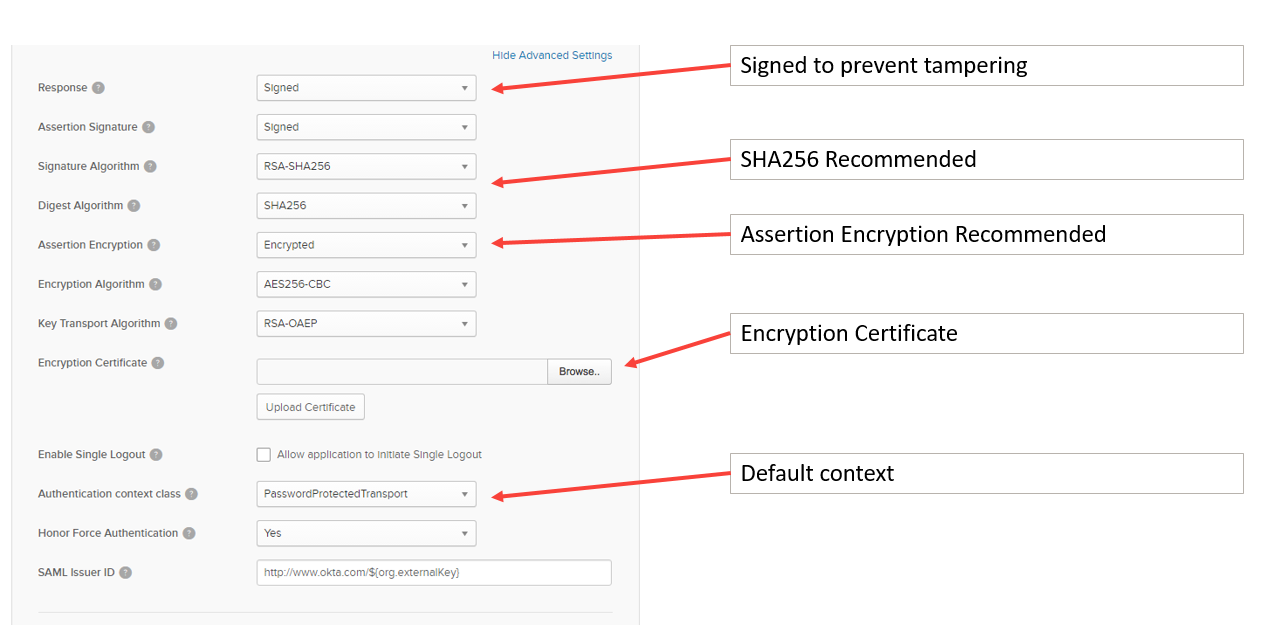
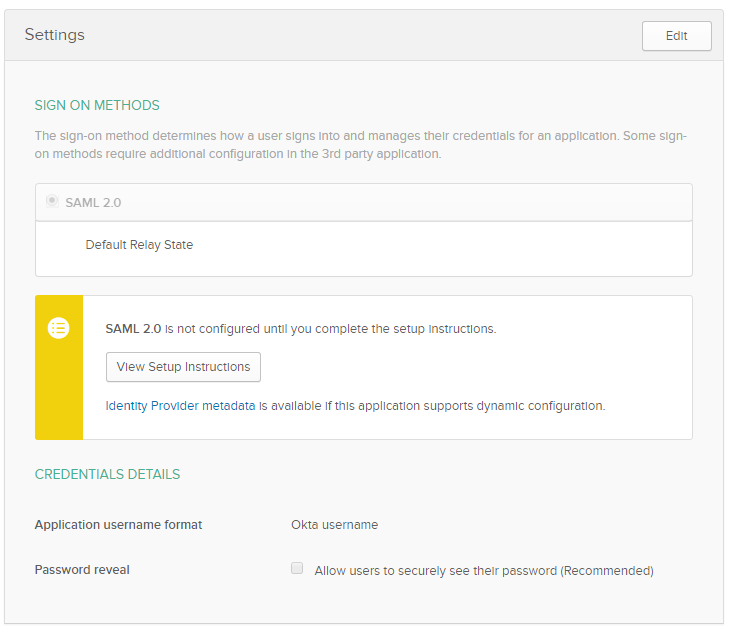
Once you are done, Okta will present you with a few things that you will need to configure the NetScaler as SP – click the ‘View Setup Instructions’ to get the certificate, redirect URL, and other fields needed:
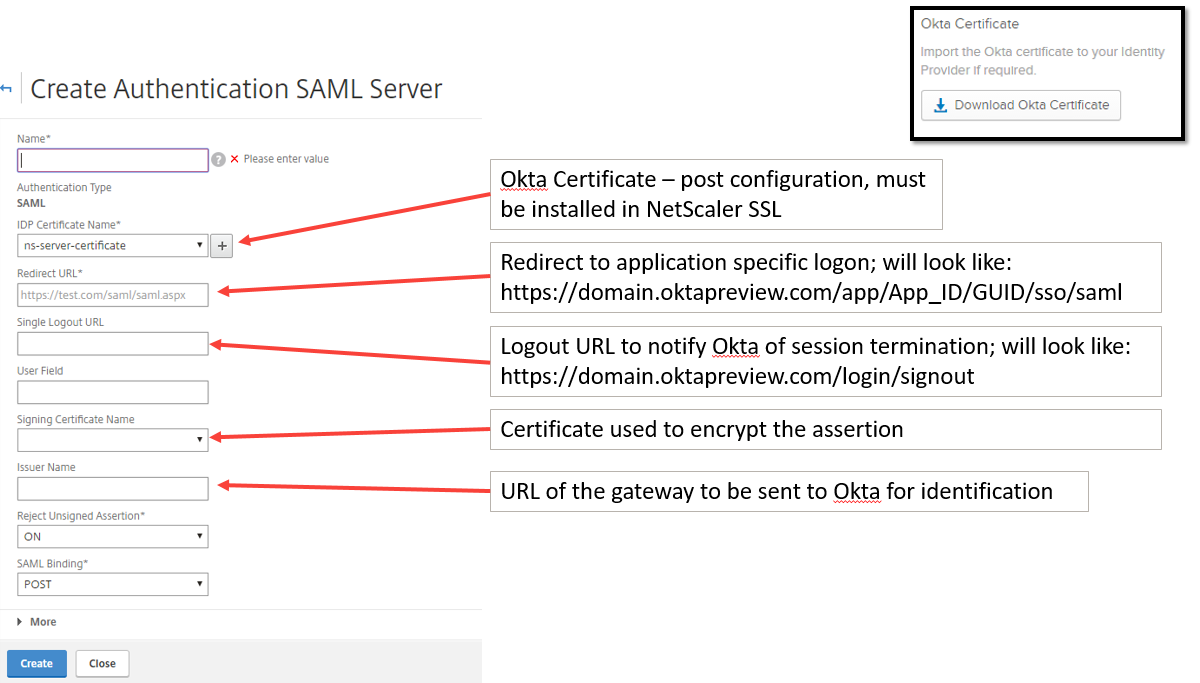
Now you can move on to configure a SAML authentication profile on the NetScaler:
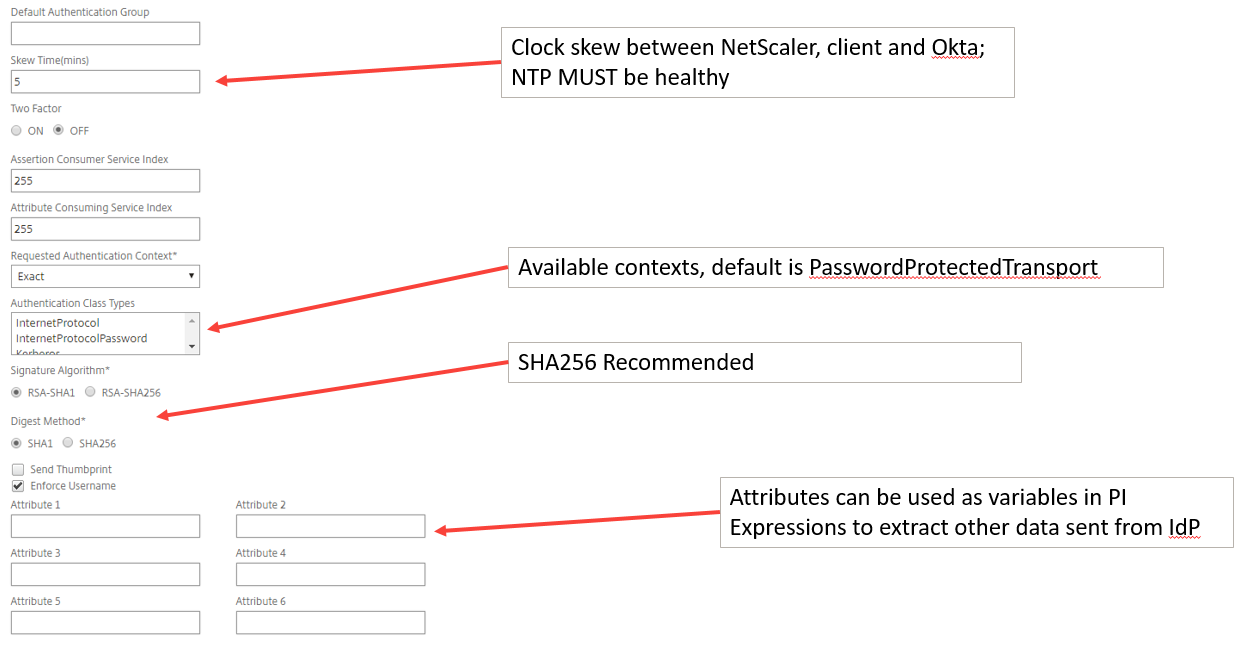
Don’t forget the advanced settings in the ‘More’ section:
That’s it!
There are numerous different configurations available – this post just covers one of them. Note that XenApp and XenDesktop don’t natively understand SAML authentication, they need the Federated Authentication Service introduced in XenDesktop 7.9. If you would like to see all of this in action, check out the October 2016 NetScaler Master class – available On-Demand here.
Hi Jacob, thanks for very good article! I was just wondering in your Okta configuration example, under ‘Advanced Settings’, which certificate have you used for Encryption? Also why “Single Logout” i sleft unchecked in Okta config, while you do specify it in NetScaler SAML Server config?
Thank you!
BR Zoran
Zoran, you can use most any certificate – it does not need to be a code signing cert for example. I used the same certificate as the one that secures the AAA vServer.
The Single Logout setting in Okta is left unchecked as it would only be needed if Okta were sending a logout to the NetScaler – in that case, the logout url of the NetScaler is https://fqdn.authvserver.com/cgi/tmlogout
Great post – once the user has authenticated with an Okta SAML token to the Netscaler, is it possible to then send that same token back to the server behind the netscaler? Or what is the best way for the user to authenticate to the application running on the backend server? It seems like just authenticating to the netscaler is only the first step in gaining access to the application.
Jeremy- it is possible to do an authentication protocol transition. Since the incoming assertion likely only includes a username or email address (not the password) the NetScaler will only be able to do SAML auth to the backend, or KCD.
The other option would be to prompt for password (step-up auth) then we would be able to do nearly any kind of authentication to the backend server.
This is a limitation in authentication protocols – when I don’t have a password, I can’t do Kerberos impersonation (or NTLM, or 401\forms auth…) and can only pass the existing SAML assertion or do KCD.
Jacob, nice write up. Interested in the ‘IdP initiated flow’. I am required to configure this up for one of our service providers. I have it working but the login page is not one of the ‘Portal Themes’ I selected, instead it looks like it is presented by the browser – different browser slight different login information. Are you able to provide some further information on utilising the method you talk about?
Regards
Rob
Hi Rob, Who is the IdP in this case? The idea behind IdP initiated is that you will login somewhere (the IdP) and then be presented with things (applications) that you need. In this workflow, you can have applications that are in the same environment as the IdP, or you can have federated apps…in the case of federated apps, the IdP realizes that they are federated, and will send the browser an assertion when the user launches the app.
Jacob, We are the IdP and successfully connect to the SP (External Bank). Its just that the login screen for when users launch the IdP (Link to local Netscaler) seems to come from the browser. I did follow this to begin the implementation – https://discussions.citrix.com/topic/392152-netscaler-as-saml-idp-sp-without-referral-information/?page=0#comment-1994936
Regards
Rob
All, Jacob was kind enough to assist with resolving this issue. It related to not having ‘Authentication’ configured on the Virtual Server, this was resolved by utilising ‘Form based Authentication’ pointing to the IDP Vserver with a authentication profile.
Many thanks
Rob