I recently converted my home lab virtualization environment from vSphere\ESX to Proxmox and documented some of the useful tools and commands I used to do so.
A little history
My lab environment has gone through MANY iterations, both in hypervisor and storage:
- https://blogs.serioustek.net/post/2016/04/25/homelab-a-few-weeks-with-xenserver-and-nutanix
- https://blogs.serioustek.net/post/2016/04/04/upgrades-lab-local-ssd-hypervisors
- https://blogs.serioustek.net/post/2015/07/16/backup-vmware-with-veeam-free-powershell-and-freenas
- https://blogs.serioustek.net/post/2014/07/01/backing-up-vmware-virtual-machines-on-freenas-aspx
- https://blogs.serioustek.net/post/2014/06/14/vmware-on-freenas-the-right-way-aspx
- https://blogs.serioustek.net/post/2013/09/07/starwind-san-v8-beta-initial-testing-aspx
- https://blogs.serioustek.net/post/2013/02/20/freenas-esx-and-nfs-synchronous-writes-and-the-zil-aspx
Learning a variety of hypervisors was due mostly to my background in consulting and I’ve tried or used most of the major hypervisors available: HyperV, XenServer, ESX and several flavors of KVM\QEMU: raw VIRSH, Nutanix AHV (CE) and now Proxmox. Storage has been much the same: StarWind iSCSI, FreeNAS NFS, iSCSI and SMB, local storage, vSan, back to StarWind, and now I’m a very happy Synology DS owner.
The Pros and Cons (and why we are here)
For the longest time, my lab was primarily ESX, with maybe one or two additional hypervisors running for learning or experimentation – I worked for a VMware partner and did a lot of work in it, so it made sense. Plus, a few years ago, everything ran on ESX, and only some things ran on other – so any appliances, applications or whatever just worked. Now things are different and I’m finding I have less time to fiddle, and need as much ‘WAF’ as possible, so cost, noise, power and cooling are big concerns…Keep It Simple, Stupid. So let’s talk about ESX.
ESX just works and so do the supporting components (vSphere, vSAN, etc) assuming that you have experience and\or know what you are doing.
High performance this is cool and all, but again…KISS this is a homelab, not an enterprise.
…but…
vSphere resource tax yes, there are a TON of things like HA, DRS, vMotion, dvSwitching, vSAN that are just awesome with vSphere, but do I really need these things? I started thinking about it, and I could honestly not tell you how many times I (or DRS) ever vMotioned anything…maybe less than a dozen times over several years. And when you think about it, it all implies that you have multiple hosts, shared storage, and here we are losing WAF…quickly.
And not to mention the CPU, storage and RAM just to run a vCenter appliance.
Pretty much everything supports most hypervisors now so that makes things much easier to switch
KVM\QEMU Part 1
I have an older Intel NUC that runs Ubuntu for Plex with Intel QAT acceleration, and one day decided to install KVM. And I was pretty impressed at how easy most things were. I was even able to fight my way through PCIe passthrough and snapshot backups – enough to convince me to convert one of my primary hosts to Ubuntu\KVM. Local SSD storage is fast and simple…done. Console sessions are fairly easy, just open an SSH session and redirect local ports over the SSH session, and connect VNC to 5900 – just works.
I will warn you: there is a bit of a learning curve with Linux in general (if you’re not comfortable with command line) and with VIRSH, especially if you’re used to a nice happy UI like ESX. But, other than that, it works great.
The other major drawback to this setup is that monitoring and administration is all CLI. There are a few options like Kimchi which is HTML5 based, but it’s pretty cludgy to get setup, and it does not appear to have been updated recently. There is also VM Manager but it runs on Linux desktop, which is not my daily driver, and it is a very client\server application that runs when it is open.
Enter Proxmox
Many years ago, my cousin was talking about this cool new virtualization thing called Proxmox (PVE)but I never really looked into it. Fast forward to now when I realized that Proxmox is essentially a highly customized build of Debian built for virtualization, with several other benefits, including:
- Rich, robust and easy to use web UI – added bonus, it doesn’t eat 10G of RAM (ahem, vCenter)
- VNC console built into the web UI is wonderful
- ZFS built in which is great, given my FreeNAS experience
- It’s still just Debian, so you (should) already know how to use it, and if you need other components, just apt install them
- While I haven’t used them, you can also:
- Cluster
- High Availability
- And then some
How to Get Started with Proxmox
The best place to start is linux basics – understanding the file system (good understanding of LVM is very helpful) and CLI will make your transition to Proxmox (and KVM in general) that much better. For the most part, the web UI is VERY intuitive, and easy to use\understand. There are a few things you need to know:
- Virtual machines are given an ID starting at 100; many commands will request you use the ID rather than a VM name, so if you’re used to PowerCLI, this is a little different
- When you install, the default settings will add a ‘local’ store; this is a very useful place to copy VM images – it is mounted to /var/lib/vz/
- The default file type is .raw but remember, qemu-img is an incredibly powerful tool and can modify most any VM file type
Migrating VMs from ESX

It’s FAR easier than I had expected to migrate from ESX to Proxmox – it takes just a few minutes to copy the VM file (depending on size) and a reboot or two to get drivers sorted. Here’s a basic step-by-step to get you started for Windows VMs.
- Enable SSH on your ESX host if it is not already running
- SSH into your ESX host and find the VMs backing disk file(s) – datastores are located in /vmfs/volumes/ you can cd by the name, then the directory will become the GUID of the datastore; browse to the VM directory and find the file names
- Shutdown the target VM
- SSH to your Proxmox host and SCP the file over:
- scp -v [email protected]:/vmfs/volumes/5cf0a01-f2231abb-9221-90ae1ba337221/TestVM/TestVM-flat.vmdk /var/lib/vz/images/TestVM.vmdk
- Remember you want the -flat vmdk file
- If you’re coming from another non-ESX system, the procedure is very much the same, I pulled over some qcow2 files and the next steps still apply
- Create the VM in Proxmox – I’ve found that keeping a small HDD mounted via VIRTIO can reduce a step or two later; note the VM ID; don’t power on yet
- You can keep NIC and SCSI adapters as VIRTIO, just understand they won’t be available until you load drivers; any storage you do need must be on the IDE bus for the initial boot, you can switch to VIRTIO after drivers are installed
- You can pre-load VIRTIO drivers while the system is still running in ESX, as well as uninstall VMware tools, but I prefer to wait
- Once the file is on the Proxmox host, import the disk into the newly created VM:
- qm importdisk targetVMID sourceVMFile.vmdk destinationStorage -format raw
- Example: qm importdisk 107 /var/lib/vz/images/TestVM.vmdk LocalZFSStore -format raw
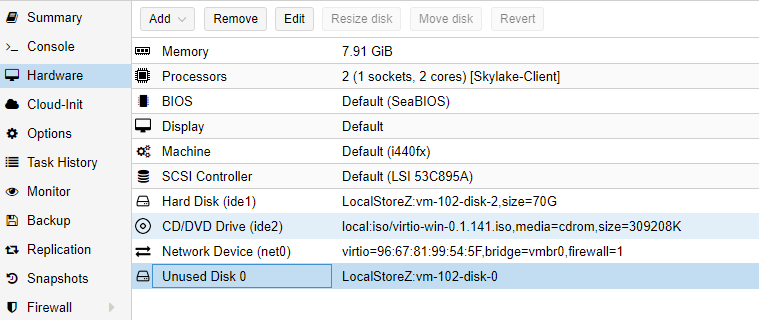
- Back in the PVE UI you should now see a detached HDD in the hardware tab of the newly created VM (once the qm command completes); add this HDD to the VM, making sure to specify IDE as the bus type
- If you have not already done so, download the latest VIRTIO driver ISO and upload it into PVE storage; mount this ISO into the new VM
- Check the options tab under boot order to make sure that the newly added IDE HDD is the first boot device; power on the VM
- The system should boot successfully, going through a few hardware changes, etc. Open device manager and add any needed drivers (from the VIRTIO CDROM you mounted earlier)
- Uninstall VMware tools if you have not already done so, and shutdown the VM
- Now you need to clean up extra hardware, and make sure everything is on the VIRTIO bus
- If you kept the small default HDD from VM creation, this can be detached and removed
- Detach (but do NOT remove) the correct system HDD; re-attach it and set VIRTIO as the bus
- Set your NIC to VIRTIO if it is not already
- Verify your boot order is correct in the options tab, especially after moving the HDDs around
- Don’t forget to clean up your local storage…when you used the importdisk command, the image file was copied, so you no longer need the vmdk that you copied over.
The biggest troubleshooting step is around making sure that the system has the correct drivers for the VIOSTOR and VIRTIO disk – if the system BSODs after just a moment of booting, it is likely due to the missing storage driver. Simply set the HDD back to IDE bus (by detach and re-attach) and it should boot.
You saved me.
Thanks a lot man
This is a great help.. I’m deciding whether I want to do the same.. VMWare esx lab to Proxmox.. mostly because I’m cheap, and I find the old hardware I have is often not supported by ESXi (cheap NICs) whereas I assume Proxmox wont care. Currently I have 2 proxmox servers running, one on each of my VMWare hosts, and I created a Win7 test VM and was even able to live migrate it between proxmox servers, so I was feeling pretty good about it, but the Windows VM can’t access the network even though it does get an IP address from the DHCP server (which is running as a DC on ESXi). I know this is a bizarre config I’m only using for test, but any reason you can think of that a Proxmox VM would be able to get a DHCP address but then not ping the same DHCP server (or any other machine for that matter)? Thanks for a great article..